
To measure an aluminum roller shutter door opening, record the width at the top, middle and bottom, then the height at the left, centre and right. Add the available headroom, space on each side, mounting depth and finished floor condition. Send all readings with a labelled sketch before confirming the manufacturing dimensions.
For a warehouse, workshop or commercial entrance, a single width × height figure leaves several questions unanswered. Does it describe the building opening, the passage required after installation, or the outside size of the complete shutter? This guide shows how to prepare a usable site survey for aluminum roller shutter doors. It does not set model-specific installation clearances.
Contents
- 1 Before measuring: label the opening and the viewing side
- 2 How to measure aluminum roller shutter door openings
- 3 Keep opening size, clear passage and overall size separate
- 4 Record headroom, side room and obstructions
- 5 Check the finished floor and threshold
- 6 A measurement record to send with your inquiry
- 7 Common roller shutter measuring mistakes
- 8 Review the drawing before releasing the order
- 9 Discuss your opening with SEPPES
Before measuring: label the opening and the viewing side
Give each entrance a unique reference, such as Door A01. Use the same reference on the sketch, photographs and quotation. State whether your sketch looks from inside or outside; this makes left-hand and right-hand notes unambiguous.
Use a suitable tape or laser measure, a level and a way to record the results. Record dimensions in millimetres and label the units on every sheet. Keep the opening clear of moving vehicles and door movement while surveying. Arrange suitable access for high points; do not climb on the shutter or remove its covers to obtain measurements.
Mark the survey as preliminary if plaster, cladding, thresholds or floor finishes are incomplete. Record the planned finished floor level separately from the floor you can currently measure. The final order needs dimensions verified against the completed opening or an agreed construction reference.
How to measure aluminum roller shutter door openings
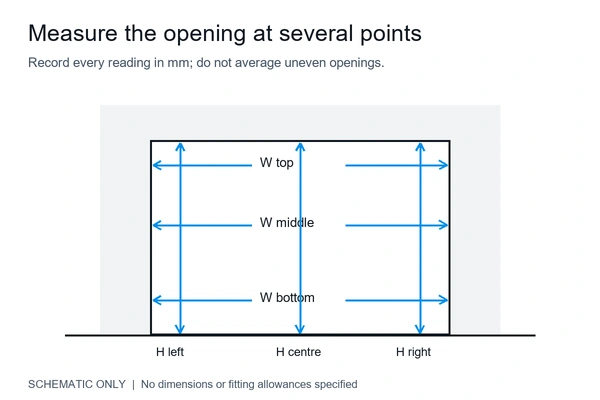
Measure the opening width horizontally between the intended boundary surfaces at three levels: near the top, middle and bottom. Keep the measurement line level. Record each reading separately rather than averaging them into one nominal width.
Measure vertically from the finished floor reference to the underside of the opening at the left, centre and right. Note a sloping lintel, uneven floor or different side heights. If accessible, record both diagonals as a further check for an opening that is out of square. Diagonal measurements do not replace checks for level and plumb.
For example, an illustrative survey might show widths of 3,008, 3,002 and 2,996 mm. Send all three values and their positions. Writing only “3,000 mm” hides the variation. The supplier and installer need to decide how the proposed guides and fixings will fit; these example values are not a manufacturing instruction.
Keep opening size, clear passage and overall size separate
The building opening is the space you survey before fitting the shutter. The finished clear passage is the usable width and height with the installed door fully open. The overall assembly includes the guides, winding assembly, brackets and other specified equipment. These roll up door dimensions can differ even when they refer to the same entrance.
Record the proposed mounting position without adding guessed allowances. A wall-face arrangement may use space beside and above the opening; a shutter within a reveal may reduce the passage. Ask for a drawing that identifies both the assembly envelope and the resulting clear passage. Installation-method selection deserves its own review, especially where vehicle clearance is tight.
Manufacturer instructions use different dimension conventions. For example, Roll-A-Shield’s measuring guide distinguishes opening measurements from overall measurements and asks buyers to identify the mounting arrangement. Its product allowances are specific to its systems; do not transfer them to a SEPPES order.
Record headroom, side room and obstructions
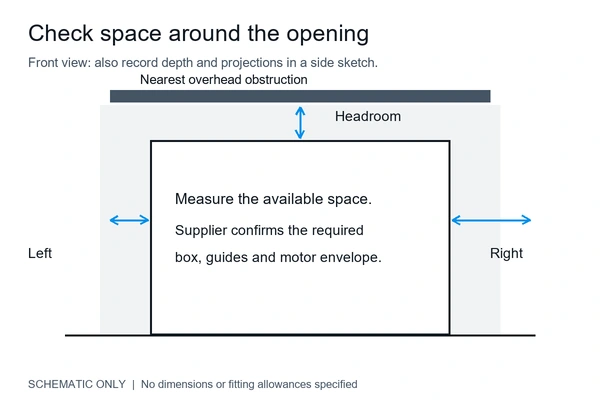
For roller shutter headroom, measure from the top of the opening to the nearest obstruction in the intended mounting area. Record beams, ducts, pipes and ceiling changes. Also show their depth and projection from the wall: a front photograph alone may make a blocked space look usable.
For roller shutter side room, record the available space separately on the left and right. Note columns, adjacent doors, shelves and services. State the proposed motor side using the viewing direction on your sketch. Available space is a survey result; required space comes from the selected assembly drawing. This article does not prescribe a universal box size or motor allowance.
Measure wall or reveal depth where relevant. Mark handles, hinges, signs or other objects projecting into the proposed curtain path. Photograph the intended fixing surfaces and identify their construction if known. Appearance alone cannot establish whether a wall or support can carry the door loads; the responsible installer or designer must confirm the support and fixings.
Check the finished floor and threshold
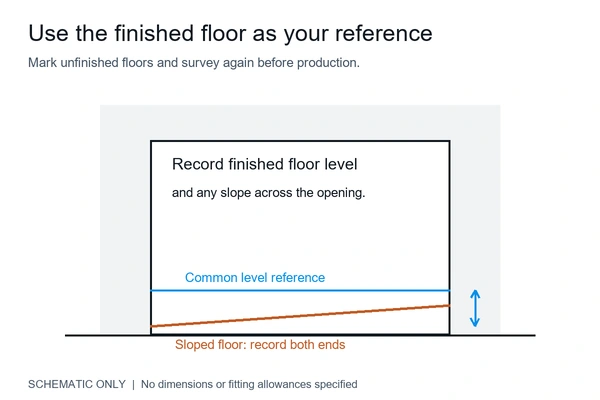
A shutter closes against the floor or specified threshold, so a change in floor level affects the survey. Record the high and low sides, any step and the position of drains. Use a common level reference to describe the difference rather than calling the floor “approximately flat”.
Do not assume a bottom seal will compensate for an uneven floor. Send the measurements and photographs so the supplier and installer can assess the closing detail. Keep the required passage height separate from the measured lintel height, especially when a vehicle or loading route passes through the entrance.
A measurement record to send with your inquiry
Copy the following fields into your site sheet. Use one sheet per opening, even if several doors appear identical. Add the survey date and the name of the person who checked it.
| Record | Details to provide |
|---|---|
| Opening reference and units | Door ID; mm; survey date; measured by |
| Viewing direction | Looking from inside or outside; mark on sketch |
| Width readings | Top / middle / bottom |
| Height readings | Left / centre / right; finished floor reference |
| Geometry | Diagonals where accessible; level/plumb observations |
| Available installation space | Headroom; left side; right side; depth |
| Floor and structure | Slope/step; unfinished work; fixing surface |
| Obstructions and services | Projection dimensions; power location; proposed motor side |
| Required clear passage | Usable width and height needed after installation |
| Attachments and status | Labelled front/side photos; sketch revision; preliminary or verified |
For the rest of the inquiry, including quantities, operation and destination, use our roller shutter quotation requirements checklist. The illustrated component guide can help you label the guides, barrel and bottom bar on the supplier’s drawing.
Common roller shutter measuring mistakes
The most consequential errors are often missing labels: giving an overall size as an opening size, reversing width and height, or describing the motor side without a viewing direction. Keep each dimension attached to a named reference on the sketch.
Other avoidable errors include measuring only once, rounding away differences, surveying an unfinished floor as though it were final, and assuming every opening in a row is identical. Photograph obstructions and record their dimensions rather than expecting the supplier to estimate scale from an image.
Do not subtract a fitting gap or add guide widths unless the supplier’s order instructions explicitly require it. Agree who applies allowances and show the resulting dimensions on the approved drawing. Otherwise, an allowance may be omitted or applied twice.
Review the drawing before releasing the order
Compare the returned drawing with the same survey revision. Check the door reference, mounting side, overall envelope, guide positions, floor datum, motor position and clear passage. Ask the supplier to identify any assumptions that still depend on site work.
A quotation based on preliminary dimensions is useful for budgeting. Manufacturing approval requires agreement on the actual order dimensions and unresolved site conditions. Recheck measurements after construction changes; an earlier photograph does not prove the opening is unchanged.
Discuss your opening with SEPPES
Send your measurement sheet, labelled photographs, intended use and required clear passage through the form below or our project contact page. Include any restricted headroom, uneven floor or uncertain mounting surface so the proposed configuration can be reviewed before you confirm the order.


